Dal Pakwaan

Dal Pakwaan


Dal Pakwan is a sindhi breakfast. It is crispy puris made of all purpose flour (maida) and topped with chana dal mixed with onion, tomato, sweet and spicy chutneys and lots of fresh coriander. I don’t know its Rajasthan connection but I remember eating it in Ajmer where it is sold as a street food. This might not be the most authentic version of dal pakwan as I have made modifications for taste and presentation.

Dal Pakwan

Traditionally pakwan is a big circle shaped crispy puri with the topping of dal. I wanted to make bite sized snacks which are easier to eat so I made them in different shapes like taco shell, canapé, and also in square shape for the ease of serving and eating. I also substituted half of all purpose flour for whole wheat flour. You can add any herbs to the pakwan dough to add a flavor to the puris. Remember to poke the puris with a fork before frying. You can also use this dough to make canapés to fill with dal or any other savory filling.

Dal Pakwan

For the dal too, I have added mung dal and toor dal to the recipe as suggested by a friend from Jaipur where it is a popular dish. It turned out healthier and tastier. You can also add deseeded and finely chopped cucumber to the topping. Chaat masala also adds to the taste.

Remember to keep the dal very thick. Mix the tomato onion mix just before serving and serve immediately to avoid the snack getting soggy.

Dal Pakwan

Ingredients

Serves 4-5

For Pakwan

  • ½ cup all purpose flour (maida)
  • ½ cup whole wheat flour (aata)
  • 1 tsp pepper powder
  • ½ tsp carom seeds (ajwain)
  • 2 tbsp oil
  • Salt to taste
  • Oil to fry

For Dal

  • ¼ cup split green gram (mung dal)
  • ¼ cup split pigeon peas (toor dal)
  • ¼ cup Bengal gram (chana dal)
  • ¼ tsp asafoetida (heeng)
  • ¼ tsp turmeric powder
  • 1 onion finely chopped
  • 1 tomato finely chopped
  • 2 green chillies finely chopped
  • 1 tsp roasted cumin powder
  • Few pinches rock salt
  • Few tea spoons lime juice
  • Few tbsp fresh coriander finely chopped
  • Few tbsp sweet chutney
  • Few tbsp mint chutney

Recipe

For the Pakwan

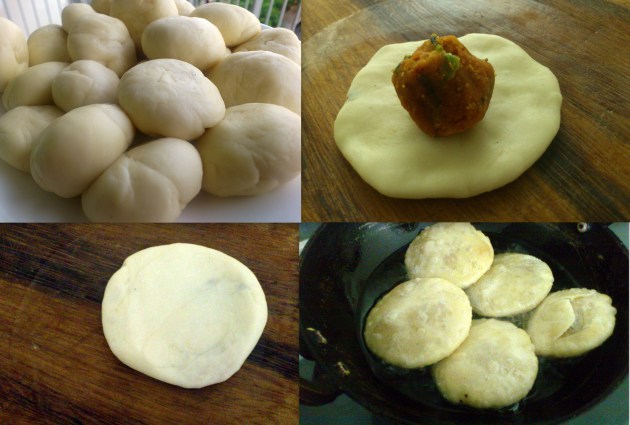
Mix together the flours, black pepper powder, ajwain, 2 tbsp oil, salt, and little water to make stiff dough. Cover and keep aside for 10-15 mins. Knead again and divide into equal number of portions. Roll and cut each portion into a shape of your choice. Poke with a fork at 2-3 places and deep fry in hot oil until its crisp.

Pakwan is usually big and circle shaped. I wanted to make bite sized snack so I cut them in small 3 inch circles and squares.

For dal

Wash and soak the dals for 1 hour. Pressure cook with salt, turmeric and asafoetida till the dals are cooked (2-3 whistles). Do NOT add too much water. The dal needs to be fairly thick. Once the pressure is released, open the cooker and mix the dal lightly and keep aside.

In a bowl, mix together chopped onions, tomatoes, green chillies, roasted jeera powder, rock salt and little lime juice.

Just before serving, add the onion tomato mix to the dal and put it on the pakwan. Top it with mint chutney and sweet chutney as per taste. Garnish with lots of coriander. Serve immediately.


Aalu Toast

Aalu Toast

Aalu toast is a fantastic lip smacking street food you can eat only in Hyderabad or so I thought until a friend from Jaipur shared this similar recipe. Aalu toast originally is triangle shaped bread topped with potato mix, deep fried and then served as a chat with various chutneys and lots of sev. This one is more of a bite sized DIY chat version. There is no match for the aalu toast you can get at couple of places in Hyderabad but this comes closest if you want to make it at home. Thank you Kshamta for reminding me of this delicious street food 🙂

You can use any bread you like. White, wholewheat, or multi-grain. I tried white and multigrain breads and both tasted fine. To make the chat healthier you can even toast the bread instead of frying it. The idea is to have a crisp and crunchy base. How you do is totally up to you. The fried one tastes better of course.

aalu toast

This is one of the best DIY snacks. You can prepare the chutneys, potato mash, and bread n advance and just let the guests decide on how sweet or spicy they want their chat. Since the chutneys and potato can make the bread soggy, this chat is best enjoyed immediately after it is topped with potato and chutneys.

Aalu Toast

Ingredients

  • 3 slices of bread
  • 1 potato boiled and mashed
  • ½ tsp chilli powder
  • ½ tsp chat masala
  • ½ tsp cumin powder
  • 2-3 tbsp thick yogurt
  • 2-3 tbsp mint chutney
  • 2-3 tbsp sweet chutney
  • 1 small onion finely chopped
  • 1/4 cup thin sev
  • Salt to taste
  • Oil to fry the bread

Recipe

Cut the bread into bite sized pieces in desired shapes. I used cookie cutters to cut the bread into bite sized circles and squares.

Heat oil in a deep pan/kadhai and fry the bread till it is crisp and brown. Drain in on paper towel to remove excess oil. Keep aside. You can even toast the bread in oven if you want to make it healthier.

To the potato mash, add red chilli powder, cumin powder, and chat masala. Mix well and check for salt. Add salt if required.

Just before serving, put approximately 1 tsp potato masala on a piece of bread; top it with mint chutney, sweet chutney, yogurt, onions, and sev. Serve immediately.

Kachori (Rajasthani Savory Snack)

Kachori (Rajasthani Savory Snack)

Kachori is an Indian snack similar to samosa (its more famous cousin) but yet different. It is a flaky pastry filled with different spices and lentils. Just like other famous snacks, there are lots of varieties of kachoris in different parts of India. This one is my grandmother’s recipe aka Bhoji wali Kachori and one of her most famous ones. Everyone in our family loves this snack made by my grandmother. I love this kachori so much that I do not eat the kachoris available outside. For me THIS is kachori 🙂

The filling made with besan is what makes this kachori different from the other kachoris. Mostly kachoris are filled with different lentils but this one has no lentils. Roasted gram flour and spices complement the flaky crust perfectly.

Only tricky part with this filling/masala is to roast the gram flour(besan) well. If the besan is not roasted properly, the kachoris will not be fluffy. If it is roasted too much, the taste is ruined. It is very important to keep mixing the besan continuously while you roast it. Our house lives on no onion garlic diet most of the times so no onion in this one. You can add onions to this masala if you like.

The dough for kachori should not be too firm. Soft and pliable dough makes better kachoris. Another trick that I learnt from my grandmother is to roll the kachoris twice (only twice) after you have filled the masala and shaped the kachori. This distributes the filling evenly and each and every kachori puffs when you do this.

These kachoris can be stored up to a week in airtight container. Eat them plain or with chutney of your choice or make a chat by adding yogurt and different chutneys.

Kachori (Rajasthani Savory Snack)

Ingredients

Makes 20 kachoris

For Dough

  • 2 cups all purpose flour (maida)
  • 3 tbsp oil
  • ½ tsp salt

For Masala

  • 2/3 cup gram flour (besan)
  • ¼ cup oil
  • 1 tsp red chilli powder
  • ¼ tsp turmeric powder
  • ¼ tsp citric acid (nimbu sat)
  • 4 tbsp chopped coriander
  • 4-5 green chillies coarsely ground
  • ½ tsp garam masala
  • 1 tsp salt
  • Oil for frying

Recipe

For Dough

Mix the all purpose flour, salt, and oil. Add little water at a time and make soft dough. Cover and keep aside for 15 minutes.

For the Masala

Put oil and besan in a thick bottomed pan/non stick pan and mix well. Do not heat the oil before adding the besan. This will help you avoid lumps in the masala. Now switch on the flame and roast the besan and oil mixture for 3-4 minutes on low flame. Roasting time varies according to the heat. The color of the mixture should be light brown. Besan can burn quickly so make sure to keep mixing it nonstop. Switch off the flame. Add green chillies, coriander, red chilli powder, turmeric, citric acid, garam masala, salt, and 1 tbsp water. Mix well. Keep aide to cool.

Divide the dough and masala into 20 equal portions. Take one portion of the dough and stretch it (appx 3 inches) using your fingers. Put one portion of masala in the center and seal the edges and flatten it very lightly.  Roll the kachori twice using a rolling pin. Follow the same process for rest of the kachoris.

Warm oil in a kadhai/thick bottomed pan. Oil should be just warm and not hot when you put the kachoris in for frying. Fry on low flame till the kachoris are golden brown. Serve hot or at room temperature.


Manchurian Pav

Manchurian Pav

Manchurian Pav or Manchuria Pav as it is known in Hyderabad is a street food from Hyderabad. It is a twist to Pav Bhaji and what a yummy twist! I love it. Despite the fat. That is why I decided to try making it at home so that I can make it healthier. I am yet to find a city (with exception to Mumbai) where you can get yummy food 24×7. Street food in Hyderabad is amazing. The city is dotted with tons of stalls selling roadside snacks. One such place is a juice/pan shop called Mayur. I don’t know if this dish is available elsewhere but I love it at this place.  I always prepare extra bhaji and freeze it for the days I am too tired to cook. It comes in handy for quick snacks like this one.

This snack should be cooked on high heat throughout. Idea is not to let the capsicum lose it’s crunch or not to overcook the onions. It should be cooked but still crunchy.  You can cook it in butter if you like but using oil or even olive oil does not alter the taste a lot.

This dish gets soggy very fast. You need to make it just before eating. You can prepare the ingredients in advance and cook it just before eating/serving. This is a perfect snack with evening tea or for that 5 pm hunger. You can enjoy this Indian fast food with hot tea or finish it off with a glass of chilled juice.

Manchurian Pav

Ingredients

  • 2 Pavs/burger buns cut into 8 pieces each
  • 4-5 tbsp bhaji
  • 1 tbsp oil
  • 1 small green chilli chopped
  • 1 tsp ginger finely chopped
  • 1-2 cloves garlic chopped
  • 2 tbsp onions chopped
  • 2 tbsp capsicum chopped
  • 2 tsp pav bhaji masala
  • ¼ tsp garam masala
  • 1 tsp fresh coriander chopped
  • 1 tbsp sev
  • salt to taste

Recipe

Heat oil in a deep pan or kadhai.  Add ginger, garlic, and green chillies and cook for a minute. Add onions and cook for a minute or till the onions are translucent. Add capsicum and cook for 30-45 seconds. Add pav bhaji masala, garam masala, bhaji, and salt. Mix well. Add the pav pieces and mix well. Transfer to the serving dish and top it with sev and chopped coriander. Serve immediately.

Pav Bhaji (Indian Street Food)

 “Pav Bhaji (Indian Street Food)” is locked Pav Bhaji (Indian Street Food)

Pav bhaji is one of the most famous street foods from India. It is a snack made with mixed vegetables mashed and cooked in spices and butter. It is served with a bread called pav (similar to hamburger buns). While it is made with fresh vegetables, the amount of butter added to it makes it an unhealthy snack. This recipe is my mom’s pav bhaji recipe which she makes without butter, onion, and garlic. For years, this was the only pav bhaji I knew. It was kind of fixed menu for our birthday parties. I have made slight change to the recipe and added onions.

Whenever my mom is left with a less quantity of different vegetables, she just boils them all and makes pav bhaji for us. This was her idea of not wasting the vegetables and giving us something healthy and tasty to eat. I remember her using even bottle gourd (lauki) in the bhaji. I love the flavour capsicum and peas add to this dish. You can add fresh red chilli paste and garlic to enhance the flavor. My mom makes it in oil and I made it with olive oil last time and did not miss the butter at all in this yummy dish. For the butter lovers in my family, I just top the individual serving of bhaji with a generous dollop of butter.  

The interesting thing about bhaji is that it tastes best the next day. It is a perfect dish to make ahead for any party. You can even freeze it and heat it for a quick snack. At my place it is more of dinner than a snack and my siblings and I enjoy this dish a lot. We eat it with naan, we spread it on dosa, and we even use it as a grilled sandwich filling. The latest is Manchuria pav. Shall post the recipe soon.

Pav Bhaji (Indian Street Food)


Ingredients

Serves 3-4

For Pav

  • 10 pav or burger buns
  • 1-2 tbsp butter/ghee/oil
  • 1 tsp pav bhaji masala
  • ¼ tsp red chilli powder
  • ¼ tsp turmeric powder
  • Salt to taste

For Bhaji

  • 4 tbsp oil
  • 1 tbsp grated ginger
  • 1 green chilli chopped
  • 2 tsp red chilli powder
  • ¼ cup finely chopped onion
  • ½ cup finely chopped capsicum
  • 2/3 cup chopped tomatoes
  • ¼ cup peas
  • 2 tbsp tomato paste
  • 2 tbsp pav bhaji masala
  • 1 cup chopped potatoes
  • 1 cup cabbage
  • ½ cup beans
  • ½ cup carrot
  • ¼ cup cauliflower florets (optional)

Recipe

Boil or pressure cook potatoes, cabbage, cauliflower, beans, and carrots. Drain excess water (Do not throw the water). Keep aside. Boil peas and keep aside.

Heat oil. Add green chillies and ginger. Cook for 30-45 seconds. Add onions and sauté. Cook for 1-2 minutes or till onions are translucent. Add capsicum and cook for 1-2 minutes. Add tomatoes and cook for 3-5 minutes till oil separates. Add tomato paste, salt, red chilli powder, pav bhaji masala and ¼ cup of water reserved from boiled vegetables. Cook for 5-7 minutes mixing in between till oil separates. Add the boiled vegetables and peas. Mash the bhaji well using a potato masher. Add more of reserved water from boiled vegetables as per desired consistency (1/2 cup should be good). Let it cook on slow flame for 10-5 minutes mixing in between. Serve with hot pav/dinner rolls and chopped onions with a wedge of lime.

For Pav

There are two ways to serve/eat pav with bhaji. One is, Slice the pav/dinner roll into two pieces, smear with generous amount of butter and warm or lightly toast on a hot griddle.

Another way is to cut each pav or dinner roll into 4-6 bite sized pieces. Sprinkle the pav bhaji masala, turmeric powder, red chilli powder, and salt on the pav pieces. Heat oil or butter in a thick bottomed deep skillet or a kadhai. Add the pav pieces and mix well. Cook for 1-2 minutes mixing very frequently. Serve with hot bhaji, chopped onions, and a wedge of lime.

Dabeli

Dabeli

Dabeli is a famous street food in Gujarat and Mumbai. This gujarati version of burger is filled with spiced potatoes, sweet, spicy, and sour chutneys and fresh pomegranates. Usually smeared with butter and served hot. Post wedding dinners can be disasterous if you are served puri-sabji and kheer combo for 5-6 dinners in a row. Dabeli was a big respite when one of my husband’s cousin made it for dinner for us. This was the first time I enjoyed a snack with sweet taste. She is a pro at making lip smacking snacks and I have borrowed this recipe from her to share it on Vegetarian Khana.

The potato filling is layered in a plate with edges and then cut into portions. The common layers are potato and spice mixture, masala peanuts, fresh coriander, pomegranate, and sev. Some people add fresh grapes too. If you want to prepare the masala ahead, add the pomegranate and sev layers in the end so that the sev does not get soggy.

Dabeli is filled with three different types of chutneys. Sweet, spicy, and sour. You can layer the chutneys and toppings on the dabeli as per taste. I like to use fresh red chillies for the garlic chutney but if that is not available you can use red chilli powder. These chutney can be made ahead and refrigerated. Left over chutney can also be stored for few days.

You can make your dabeli healthier by using the whole wheat or multi grain burger buns. Substitute the butter with olive oil. I did not see a major difference in taste when I made these substitutions. Just spread the chutneys evenly, add the potato filling and press the dabeli a little while cooking. Dabeli can be enjoyed both hot and cold.

Dabeli


Ingredients

  • 4 pav/burger buns
  • 4-5 tbsp garlic chutney
  • 4-5 tbsp coriander chutney
  • 4-5 tbsp sweet chutney
  • 4-5 tbsp thin sev
  • 4 tbsp pomegranate
  • Butter to cook the dabelis

For filling

  • 1 ½ tbsp dabeli masala
  • 2 potatoes boiled and roughly mashed
  • 1 onion chopped
  • 2-3 pinches turmeric powder
  • 4 tbsp masala groundnuts
  • 3-4 tbsp chopped coriander
  • 1 tbsp oil
  • Salt to taste

For the garlic chutney

  • ¼ cup peeled and chopped garlic
  • Salt to taste
  • 1 fresh red chilli (substitute this for 1 tbsp red chilli powder if fresh red chilli is not available)

For coriander chutney

  • ½ cup chopped coriander
  • 1 tbsp groundnuts
  • 1 tsp lemon juice
  • Salt to taste

Recipe

For the coriander chutney

Grind all the ingredients to a smooth paste using little water. Keep aside.

For garlic chutney

Grind all the ingredients to a smooth paste using little water. Keep aside.

For the filling

Heat oil in a kadhai or non-stick pan. Add the onions and cook for 1-2 minutes till the onions are translucent. Add the potatoes, turmeric, dabeli masala, and salt. Mix well and cook for 2-3 minutes.

Transfer the mixture to a round or square plate with edges and fill it evenly. Add a layer of masala groundnuts and top with a layer of chopped fresh coriander. Cut the filling in four portions and keep aside. If masala groundnuts are not available, you can make them at home. Just roast the groundnuts in very little oil and add salt and red chilli powder.

To make dabeli

Slice the pav/bun into two pieces. Spread approximately 2 tsp each of coriander chutney and sweet chutney on one side and 2 tsp garlic chutney on another side. You can spread more/less chutneys as per taste. Add a portion of the potato filling and top it with approximately 1 tbsp of fresh pomegranate and 1 tbsp sev. Close the bun and brush it with butter on both sides.

Heat a tava or non-stick pan. Cook the dabeli on both sides pressing it lightly. Serve immediately with sweet chutney, coriander chutney, or ketchup.

Savory Tarts (Katori Chaat)

Savory Tarts (Katori Chaat)

Festivals of India are as colourful as the country itself. Holi was more colourful when we were kids and lived in the old city of Hyderabad. Sadly, it just turned into a holiday as we grew up and started working. This festival of colors has made it back into our lives with the arrival of our little monster Aryan. My mom used to prepare lot of finger food or snacks for us during festivals like Sankrantri and holi as we did not have time to sit and eat a proper meal. This is one of them. Katori chaat (Savory Tarts if you like a fancy name). Here is a healthy version of the katori chat that my mom used to prepare for us during festivals.

Traditionally, katori chaat is filled with potatoes and chana, but I like it with the sprouts. Since I was baking the tarts instead of frying them, I decided to go with this healthy filling that is made at my place. You can prepare the sprouts in advance to save time. Steam, boil, or pressure cook the sprouts with salt.

Readymade tarts are easily available at supermarkets in India so if you live in India, you can save yourself the time and effort of making these tarts. But if you want to try these baked tarts, these are not tough to make. You can make them in advance and can even freeze them for later use.

Toppings in chaat are always as per taste. You can add the sweet chutney, chilli powder, and other spices as per your taste. If you are making this for a group of people, you can just keep the toppings, filling, and tarts together and people can make their chaat as they like. Do not prepare the whole tart with filling and topping in advance or else it will get soggy. This Indian chaat is perfect for a DIY snack when you have a group of people with different tastes. Happy Holi!

Savory Tarts (Katori Chaat)

Ingredients

  • ½ cup mung sprouts boiled
  • ½ cup moth sprouts boiled
  • 2 inch piece ginger grated
  • 2 tsp oil
  • 1 green chilli finely chopped
  • ½ cup yogurt
  • 1 small onion chopped
  • 1 small tomato chopped
  • 3 tbsp tamarind chutney
  • 3 tbsp mint chutney
  • 4-5 tbsp sev (nylon sev)
  • 2-3 tbsp chopped coriander
  • 1-2 tsp red chilli powder
  • 1-2 tsp cumin powder
  • Salt to taste

For Tarts (makes 12-14 cups)

  • 50 gms all-purpose flour (maida)
  • 2 pinches baking powder
  • 25 gms butter
  • ¼ tsp salt
  • ¼ tsp carom seeds
  • 2 -3 tbsp milk

Recipe

Combine flour, baking powder, carom seeds, and salt. Rub in the butter using your fingertips. The mixture should resemble bread crumbs. Add 2 tbsp milk and make a stiff dough. Add little more milk if the dough is too dry to combine. Cover with a damp cloth and keep aside for 15 minutes. After 15 minutes, knead again and roll out the dough into a sheet (approximately ¼ inch thick). Cut rounds using a cookie cutter (appx 3 inches) or small bowl. Press the rounds in a tart mould or a cupcake mould. Prick at 2-3 places using a fork.

Preheat oven to 230 degrees and bake at 230 degrees for 10-15 minutes.

Heat oil in a kadhai or non-stick pan. Add grated ginger and green chilli. After 30-40 seconds add the sprouts and salt. Mix well. Cook for 2-3 minutes and switch off the gas. Cool the sprouts and keep aside.

Whisk the yogurt with salt and keep aside.

Just before serving, fill the tart with appx 1tbsp of sprouts. Top it up with yogurt (appx 1 tbsp), tamarind chutney (as per taste), mint chutney (as per taste), chilli powder (1-2 pinches), cumin powder (1-2 pinches), chopped onions and tomato (few pieces), sev (3-4 pinches), and chopped coriander. Serve immediately.

Dahi Vada

Dahi Vada

Dahi vada or Dahi bhalla is an Indian chaat. It is a deep fried lentil dumpling, soaked in thick yogurt and topped with garnishes like sweet chutney, chilli powder, cumin powder, and coriander. Dahi vadas are not as difficult to make as they look. Lentil dumplings are fried and soaked in salted water and then in thick yogurt and garnished just before eating. The secret to light and fluffy dahi vadas is to beat the batter in circular motion for 3-4 four minutes just before making the vadas.

In some parts of India, especially in Delhi and Gujarat, the yogurt used for soaking the vadas is sweetened. I prefer the unsweetened yogurt and like to add the sweet chutney as a topping. There are different versions of dahi vada around the country and this is my family recipe. It might appear bit different from the other recipes you find on Internet. My mom prefers to add some spices like chilli powder and some cumin powder to the yogurt in which the dahi vadas are soaked.

In Hyderabad, during the month of Ramzan, you can find roadside stalls selling dahi vadas in the evenings when people break the fast. I have blurred memories of  the vendors shouting funny slogans to attract people to their dahi vada stalls. These vendor sell dahi vadas with different toppings. Red chilli powder, cumin powder, and sweet chutney are common toppings for dahi vada. People even add chaat masala, grated coconut, sev, mint chutney, and pomegranate as toppings.

Dahi vada tastes best when it’s chilled. This is a fixed side dish at my place for the Diwali dinner. It can be served as a snack or as a side dish with meals.

Dahi Vada

Ingredients

Makes 15 dahi vadas

  • 2/3 cup urad dal soaked for 5-6 hours
  • 3 cups yogurt beaten
  • 1-2 tsp salt
  • 1-2 tsp red chilli powder
  • 1-2 tsp cumin powder
  • 1-2 tsp black salt
  • ¼ cup tamarind chutney
  • 1-2 tbsp chopped coriander
  • Oil for frying

Recipe

Drain water from the soaked urad dal and grind it to a smooth paste using as little water as possible. Transfer the paste to a mixing bowl. You can add a pinch or two of soda at this stage if you wish. But this is optional.

Heat oil in a deep pan or kadhai. Wet your palms. Drop around a tablespoon full of the dal paste and shape it round. Carefully slide the vada into hot oil. Do this for rest of the vadas. Fry on medium flame till the vadas are golden brown. Another option is to use a wet table spoon and carefully drop vadas into the hot oil. Remember to dip the spoon in water before taking the paste for each vada.

Put the vadas on a paper towel to drain excess oil. Take around 1 ½ to 2 cups of water in a bowl. Add around two tsp of salt and mix. Now add the fried vadas to this water and let them soak for 30-40 minutes.

Meanwhile, beat the yogurt with salt, and little red chilli powder. Squeeze out the vada from salt water after 30-40 minutes. Dip the vadas in the beaten yogurt and refrigerate for 30-40 minutes if you like the dahi vada chilled.

Just before serving take the vadas in serving dish. Top it with little more yogurt. Garnish with pinch of black salt, cumin powder, and red chilli powder. You can adjust the garnish as per taste and quantity of the vadas. Add tamarind chutney and chopped coriander.

Ragda Patties (Aalu Tikki Chaat)

Ragda Patties (Aalu Tikki Chaat)

Ragda patties is a famous street food from India. Potato patties are topped with boiled green peas, onions, tomatoes, spices and sweet and spicy chutneys to make this mouth-watering street food (Chat). This dish has variations according to regions and this recipe is of the ragda patties (called cutlet or ragda katlis) you can find on the streets of Hyderabad. Boiled green peas tempered with basic spices is called ragda. You can also use dry white peas for the ragda if you wish.

Potato patty known as aloo patty or cutlet is made with boiled potatoes and very few spices. Some people add fillings to these patties. Common stuffing for patties includes finely chopped carrots and French beans or roasted gram flour with spices. I have not used any stuffing in the recipe here. I like to play around with the toppings more than the stuffing.

Tricky part for people who do not cook often is the topping as per taste instruction. But this really has no other way. Some people like their chat sweet, some like it spicy. So you really need to experiment with this one. I like my cutlet with yogurt and lots of sev. I enjoy my cutlet piping hot with chilled yogurt on top.

Normally, this dish is served in layers of patty, ragda, and the toppings. If you want to eat it the hyderabadi way, Crumble the patty on a hot griddle, add some ragda and little panipuri water. Give it a nice mash or mix. Add the spices and chutneys for topping and mash again. Now take it in a plate and top it with yogurt, coriander, and sev. This is hyderabadi ragda katlis for you. Enjoy!

Ragda Patties (Aalu Tikki Chaat)

Ingredients

Serves 4

For the Ragda

  • 1 cup dried green peas (hara batana) soaked overnight
  • ¼ tsp mustard seeds (rai)
  • ¼ tsp cumin seeds (jeera)
  • ¼  tsp asafoetida (heeng)
  • ¼ tsp turmeric
  • Salt to taste
  • Ghee/oil for shallow frying

For the Patties

  • 4 potatoes boiled, peeled, and mashed
  • 2 tsp corn flour
  • 2 tsp ginger and green chilli paste
  • 1 tsp finely chopped coriander
  • Salt to taste

Toppings/Garnish

  • 1-2 tsp red chilli powder
  • 1-2 tsp black salt
  • 1-2 tsp cumin powder
  • 2 tsp chopped coriander
  • 7-8 tbsp nylon sev
  • 1 onion finely chopped
  • 1 tomato finely chopped
  • 7-8 tbsp tamarind chutney
  • 7-8 tbsp mint chutney
  • 10-12 tbsp fresh yogurt beaten with some salt

Recipe

For The Ragda

Pressure cook the peas with little salt and 2 ½ cups of water for 5-6 whistles.  Heat oil in a kadhai. Add mustard and cumin seeds. Once the seeds pop, add turmeric and asafoetida and the boiled peas. Add around one cup of water and mix well. Mash the peas a little with the back of a spoon. Simmer for 7-10 minutes or till the ragda thickens and keep aside.

For the Patties

Combine the ingredients for patties and divide the mixture into eight portions. Shape each portion into flat round disc.  Heat a thick griddle. Put ¼ tsp ghee and place a patty. Smear some more ghee on top of the patty and turn it over after a minute. Move it to the side of the griddle. Follow the same procedure for all the patties. Keep turning the patties every 1-2 minutes till they turn brown on both sides. Keep aside.

To Serve

Place two patties in a bowl or a deep plate. Add close to 1/4th of the ragda, 2 tbsp yogurt, 2 tsp onions, 2 tsp tomatoes, few pinches each of red chilli powder, cumin powder, and black salt. Add the tamarind chutney and mint chutney as per taste. Top it with chopped coriander and nylon sev and serve.

Panipuri

Panipuri

Panipuri for me is the best food on earth. It is a Crisp semolina puri filled with green chana and sour and spicy water. It is a very popular chat (type of snacks in India) in India and you can find it in any region you go. Every state has its own version of panipuri. It’s Golgappa in Delhi, Puchka in Calcutta and Gupchup in Hyderabad. I have eaten panipuri at various places but Gupchup wins it hands down for me. Not that I don’t like golgappa or puchka, but nothing can match the hot chana and cold water filled gupchup you get in Hyderabad.

Making the puri for panipuri at home can get little tricky. You need to roll out the dough thin and keep in moist always. But if you are living outside India and don’t get the puris readily available, it is worth the effort.

To make the puris fluffy, press the puri with back of a slotted spoon till it puffs up. Make sure the oil is hot and you fry them on a medium flame. You can even make flavoured puri by adding ¼ tsp of your choice of dried herbs.

Coming back to gupchup, the hot green peas filling is what sets it apart from other versions of panipuri. It is a very simple filling of boiled green peas cooked in very basic tempering. There are other fillings too like potato and Bengal gram (kala chana), sprouts, boondi, onions etc. If you like your panipuri sweet apart from the sour and spicy taste, you can add little sweet tamarind chutney along with the filling.

Panipuri is a comfort food for me and my sister. We can eat it anytime of the day. There are lot of famous street side vendors in Hyderabad where you can try this chat. If you are health conscious and don’t have a very strong immune system to eat roadside food, try this homemade panipuri.

Panipuri

Ingredients

For Puri (makes 25 puris)

  • ¼ cup maida
  • ¼ cup semolina
  • Salt to taste
  • Oil for frying

For Water

  • ½ cup tightly packed mint
  • ¼ cup loosely packed fresh coriander
  • 2 green chillies
  • 2 tsp black salt
  • 1 tsp cumin powder
  • ½ tsp salt
  • 2 cups tamarind water
  • 2 cups water

For Filling

  • ¼ cup dried peas soaked for 6-7 hours
  • 1tsp oil
  • ¼ tsp cumin seeds
  • 2-3 pinches turmeric
  • Salt to taste

Filling 2

  • 2 potatoes
  • ¼ cup Bengal gram (black chana) soaked for 6-7 hours
  • ½ tsp chopped coriander
  • ½ tsp green chilli paste
  • Salt to taste

Recipe

For Puri

Combine the ingredients for puri with little water and make a firm dough. Cover with a damp cloth and keep it aside for 20 minutes. After twenty minutes, knead the dough again and divide into two rolls. Roll out each portion into thin circle and cut small (approximately 1 ½ to 2 inches) round puris using a cookie cutter or a sharp round cap.

Heat enough oil to fry the puris and fry few puris at a time, till they are crispy and brown on both sides.

Store the puris in airtight container.

For Water

Grind mint, coriander, and green chilli to a smooth paste. In a jug or vessel, combine this paste with all the other ingredients for water and mix well. Taste for salt at this time and adjust salt as per taste. Chill in the fridge for 1-2 hours.

For Filling 1

Pressure cook the soaked peas with salt for 3-4 whistles or till the peas are very soft and mushy. Heat oil in a pan. Add cumin seeds. Once the seeds pop, add the cooked peas and turmeric. Check for salt and cook for 2-3 minutes.

For Filling 2

Pressure cook the potatoes with little salt for 3 whistles or till soft and mushy. Peel and keep them aside.

Pressure cook the Bengal gram (black chana) with salt for 4-5 whistles or till they are soft. Mix together, the potatoes, chana, and green chilli paste. Check for salt and add more if required. Keep the filling aside.

For serving

Punch/crack a hole in the puri. Add the filling of your choice (appx 1 tsp in a puri). Fill it with the prepared water and eat it right away.