Dal Baati Churma

Dal Baati Churma

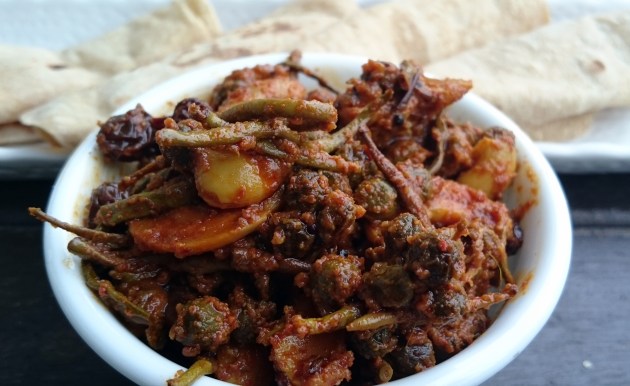
Dal Baati churma is probably the most popular of the Rajasthani cuisine. Ghee dipped baatis are served with a spicy dal and sweet churma laddus. Add gatte ki sabji and rice to this and this turns into a big delicious and royal Rajasthani meal for you. As with all other recipes, this is my family recipe of daal baati which my mom has been cooking for more than 40 years now. I would suggest cooking dal baati only in ghee to get the authentic taste. It is a lengthy recipe but every bite is worth the time you spend cooking this.

baati

Baatis can be baked or fried. Some people boil the baati first and fry it after that. My mom just fries the baatis in ghee. Semolina adds a nice crunch to the baatis while ghee makes them melt in mouth. Make sure to cook baatis on a low to medium flame so that they are cooked well. Some people drizzle ghee on baatis while some keep them dipped in ghee until they serve.

churma

Panchmel dal and churma are the other two importants parts of this dish. You can serve the churma in form of laddu or in powder form. Ghee again decides the taste of churma. Use desi ghee and this will take the taste of churma to another level.

Do serve the dal, baati, churma with a wedge of lime. Traditionally, piping hot dal and baati are crushed and mixed with churma and topped with more ghee and a dash of lime and fresh onion slices.

Dal Baati Churma

Ingredients

Makes  8-10 servings

For Baati

  • 2 cups whole wheat flour (aata)
  • ¼ cup semolina (rava)
  • ¼ cup chickpea flour (besan)
  • ¼ cup yogurt (dahi)
  • ½ tsp carom seeds (ajwain)
  • ¼ cup pure ghee
  • ¼ tsp soda bicarbonate
  • 2 pinches turmeric
  • Salt to taste
  • Ghee to fry the baati

For Dal

  • ½ cup moong dal
  • ½ cup toor dal
  • ¼ cup urad dal
  • ¼ cup chana dal
  • 2 tbsp oil
  • ¼ tsp mustard seeds
  • ¼ tsp asafetida (heeng)
  • 2-3 green chillies
  • 2 inch piece of ginger grated
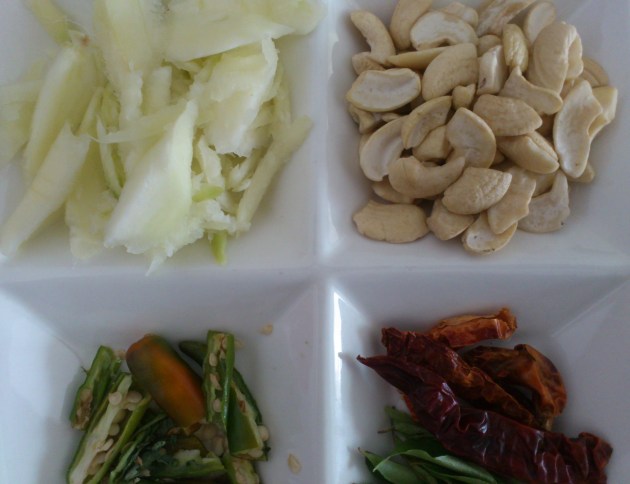
  • 8-10 curry leaves
  • 1 bay leaf (tej patta)
  • 1 dried red chilli
  • 2 inch piece of cinnamon (dal chini)
  • 2 cloves (laung)
  • ½ tsp turmeric powder
  • 2 tsp red chilli powder
  • 2 tsp coriander powder
  • 1 tsp garam masala
  • 2 tbsp chopped fresh coriander
  • Salt to taste

For Churma

  • 1 cup whole wheat flour (aata)
  • ¼ cup pure ghee
  • ½ cup powdered sugar
  • ¼ tsp cardamom powder (ilaichi)
  • 1 tbsp chopped dry fruits (almonds, pistachios and cashews)

Recipe

For Dal

Wash and soak the dals for 20-30 mins.  Drain water and put all the dals in pressure cooker. Add 4 cups water and some salt and cook for 3 whistles. Once the cooker is completely cooled, open the lid and mash the dal lightly and keep aside.

Heat 2 tbsp oil in another pan or kadhai. Add mustard seeds and once the seeps pop, add bay leaf, cloves, cinnamon, dried red chilli. Sauté for few seconds and add green chillies, heeng, curry leaves and grated ginger and sauté for few seconds.

Add a cup of water, turmeric, coriander powder, red chilli powder and garam masala. Once the water comes to boil, add the cooked dal and mix well. Check the consistency of dal and add more water if required.  Also, check for salt at this stage and add more salt if required. Bring the dal to boil and let it cook for 5-6 minutes on low flame. Finally add chopped coriander and switch off the gas.

For Churma

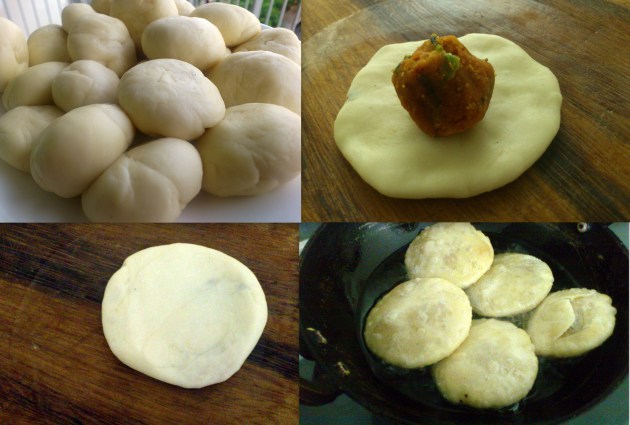
In a deep bowl, mix together the flour and ghee.  Add little water and knead firm dough. Divide the dough into eight portions. Take each portion in your palm and close your fist to make an indentation in the dough. Heat ghee in a frying pan and deep fry the dough portions till they are golden brown. Fry them on low flame. Drain on absorbent paper and let them cool down completely.

Once they are cooled, break them into pieces and grind them to powder using a grinder. Add sugar, cardamom powder, and dry fruits and mix well. You can serve the churma like this in powder form or you can even make laddus out of it. To make laddus, heat 2 tbsp ghee and pour it on churma and mix well. Grease your palms with some ghee and take 1-2 tbsp of churma in your hand and roll it into round balls.

For Baati

Mix all the ingredients for baati and knead firm dough using little water and rest it for 5-10 minutes. Knead the dough again for 5-6 minutes. Divide the dough into 20 portions. You can make more or less baatis depending on the size of the baati you like. Shape each portion into an even sized ball and flatten the balls lightly using your thumb to make an indentation in the center of the baati.

Heat ghee/oil in a frying pan and fry the baatis till they are golden brown. Make sure to fry the baatis on a medium flame so that the baatis are cooked from inside too. Drain the baatis on absorbent paper and keep them aside.

To serve

Break baati in two pieces and pour a spoonful of melted ghee on top and serve with dal, churma, a wedge of lime and onion slices.

Badam ka Seera

Almond Halwa

Seera can be cooked very quickly. Roasting the flour is the only thing that takes time. And well roasted flour is the key to a delicious seera. Flour gets burned quickly. Roast it on a slow or medium flame and do not leave it unattended. If it is over roasted it can even taste bitter. Do remember to soak the almonds for at least 4 hours. This will help to grind them very smooth.

Badaam ka Seera

Seera Puri is the traditional combination but the combo I like is papd churi with seera. Crush a roasted papad and serve it with the seera. It cuts the sweetness of seera. This seera tastes best when it is hot.

Almond Halwa

Ingredients

Serves 4

  • ½ cup whole wheat flour (gehun ka aata)
  • ½ cup pure ghee
  • ½ cup sugar
  • 10-15 almonds soaked for 4 hours
  • 1 ¼ cup hot water

Recipe

Peel the almonds and grind them to a smooth puree. Use little water if required.

Heat ghee in a kadhai or a thick bottomed pan. Add the flour and roast on low flame till it is lightly browned and you can smell the aroma of ghee and flour. Keep mixing the flour non-stop or it might get burnt. Add the almond paste and roast again for 2-3 minutes till the flour is brownish. Add the hot water and stir continuously making sure no lumps are formed. Once the seera is slightly thicker, add the sugar and mix well. Cook for 1-2 minutes. Serve hot with papad.


Rajasthani Mirchibada

Rajasthani Mirchibada

Mirchi bada in Rajasthan or mirchi bhajji is South is a delicious street food made of thick and long green chillies dipped in gram flour and deep fried. It perfectly complements piping hot tea on a rainy day. For a very long time, this was our Sunday special snack along with other bhajiyas. In Rajasthan and at my home too, the mirchi bada is stuffed with a potato filling which is slightly sour and cuts the heat of chillies.

Mirchibada Stuffing


It is a good idea to deseed and boil the chillies for few minutes. It helps to reduce the heat in chillies. Remember not to make the batter too thin or it won’t stay on the chillies. Traditionally, roasted cashews and anardana are added to the filling but I like to add roasted peanuts and tamarind paste to add a sour kick to the spicy chilli. In south, it is slit open after frying and topped with finely chopped onions and masala peanuts. Whether you decide to serve it the south Indian or the north Indian style, remember to serve them hot. That is when they taste the best. This snack is best served hot along with mint or tamarind chutney.

Mirchibada

Ingredients

Makes 8-10 Mirchi Badas

  • 8-10 long green chillies (the less hot ones used for Mirchi bhajjis)
  • Finely chopped onion (optional topping)
  • Masala peanuts (optional topping)
  • Oil to fry

For the filling

  • 2 potatoes boiled and peeled
  • 3-4 tbsp groundnuts roasted and coarsely grounded
  • 1 green chilli finely chopped
  • ½ tsp red chilli powder
  • 2-3 pinches turmeric powder
  • ½ tsp anardana powder (can be swapped for ¼ tsp aamchur powder or ¼ tsp tamarind pulp)
  • Salt to taste

For the batter

  • ½ cup gram flour (besan)
  • 2 pinches turmeric
  • ¼ tsp red chilli powder
  • ¼ tsp carom seeds (ajwain)
  • Salt to taste
  • Chilled water (approximately ½ cup) to make batter

Recipe

Slit the chillies along their length to make a pocket for the masala. Deseed them and boil them in rolling hot water for 3-5 minutes. Drain and keep aside.

To prepare the filling, mix all the ingredients for the filling and mash them using hand or a potato masher. You can choose to add amchur or anardana powder instead of the tamarind paste. Idea is to add a hint of sourness to the filling. You can add all the spices as per taste to make the filling more or less spicy.

Take one boiled chilli at a time and fill it with the potato filling. Do not over fill the chillies. Keep them aside till you are ready to fry them.

For the batter, Mix the gram flour, turmeric, red chilli powder, carom seeds and salt. Add little water at a time to make a paste consistency batter. It should stick to the chillies when you dip them in water. It took me a little less than ½ cup of water to get the right consistency. Using ice cold water to make batter for bhajiyas helps them become crispier.

Heat oil in a kadhai. It should not be smoking hot. To check if the oil has reached correct temperature, just drop a tiny bit of batter in the oil. If it sizzles and floats immediately, the oil is hot enough to fry the chillies. Dip a potato filled chilli in the batter and ensure that it’s properly coated. Drop it carefully in hot oil and fry until golden. Fry few chillies at a time.  Drain them on an absorbent paper and serve hot with mint or tamarind chutney.


Gatte ke Chawal

Gatte ke Chawal

Gatte ke chawal is my family’s signature monsoon dish. Gatte is type of boiled or fried gram flour dumplings used in Rajasthani cuisine. This delicious rice cooked with fried gatte, potatoes, and basic spices gets ready in a jiffy and tastes best when it is piping hot. This is one of the very few dishes which my whole family enjoys without any complains.

Gatte

You can add cashew nuts, green peas, boiled Bengal gram(kala chana) to this rice. Ours has been a no onion, no garlic home for a very long time. Most of the dishes are still made the same way without onion or garlic. You can add ginger garlic paste, chopped onions, and a dash of lime to add more taste a flavor to this dish.

Gatte ke Chawal

This rice tastes best when it is eaten hot as soon as it is made. It does not need any accompaniment but goes well with plain yogurt.

Gatte ke Chawal

Ingredients           

  • 1 cup rice
  • 2 cups water
  • 1 small potato peeled and cut into small cubes
  • 2 tbsp oil
  • ¼ tsp cumin seeds (jeera)
  • 2 dry red chillies
  • 10-12 curry leaves
  • 2 tbsp ground nuts
  • 2 bay leaves (tej patta)
  • 5-6 cloves (laung)
  • ¼ tsp turmeric
  • 2-3 tbsp chopped fresh coriander
  • Salt to taste

For Gatte

  • ½ cup gram flour (besan)
  • 2-3 pinches turmeric
  • ½ tsp red chilli powder
  • ¼ tsp carom seeds (ajwain)
  • 1 pinch soda
  • Salt to taste
  • Oil to fry

Recipe

For Gatte

Mix all the ingredients of gatte. Add 1 tbsp water at a time and mix till everything comes together to form a stiff dough. Divide the dough into equal portions and roll them into cylindrical rolls using your palms. Cut these rolls into approximate 1 inch pieces. Boil plenty of water in a pan and cook these gattas in boiling water for 7-8 minutes. Drain and keep aside. Heat oil and fry the gattas till they are light brown. Drain and keep aside. In the same oil, fry the cubed potatoes till they are lightly browned and keep aside.

For rice

Wash and soak the rice in 2-3 cups of water for 10 minutes.

Heat oil in a pressure cooker.  Add cumin seeds, cloves, and bay leaves. Once the seeds pop, add curry leaves, green chillies and dry red chillies. Sauté for few seconds. Add groundnuts and cook for 20-30 seconds. Add the fried gatte and potatoes. Drain water from the rice and add rice to the cooker. Mix well making sure not to break the rice. Saute for 45 seconds to a minute. Add 2 cups of water, turmeric, and salt. Mix well and close the pressure cooker and cook for 2 whistles or till the rice is done (the time differs from cooker to cooker). Once the pressure is released, open the lid, add chopped coriander and mix well. Serve hot.

Raw Mango Rice (Kairi Ke Chawal)

Raw Mango Rice

Raw mango rice is the summer version of tamarind rice or lemon rice. Cooked rice is mixed with a paste made of raw mango, urad dal, chana dal and ground nuts.

Summers in Hyderabad can get super hot and my mom’s way to avoid getting into the kitchen is to cook dishes that can be made ahead and need very less time in kitchen before serving them. One of such dishes is the raw mango rice. It can not only be prepared ahead but is also good to beat the heat.

Tadka_mangoRice

You can replace groundnuts with cashew nuts if you like. Some people also add heeng and grated coconut to the tadka. Green chilli is the only source of spice in this dish. You can add more or less green chillies based on taste and the spice level of the chillies you are using.

Chatan

The quantity of raw mango depends on the sourness of the mangoes. Mix few table spoons of mixture at a time and keep tasting while mixing to get the desired taste.

You can prepare the mango paste in advance and store it in fridge for six to eight weeks. This is an excellent dish to transform leftover rice to a tangy treat.

Kairi ke Chawal

Ingredients

serves 2-3

  • 1.5 cup cooked rice
  • 4-5 tbsp oil
  • ¼ tsp cumin seeds
  • 10-15 curry leaves
  • 4-5 green chillies
  • 1 tsp urad dal
  • 2 tsp chana dal
  • 2 tbsp groundnut
  • 3 dry red chillies
  • ¼ tsp turmeric powder
  • 1 cup grated raw mango
  • Salt to taste

Recipe

Heat oil in a kadhai or thick bottomed pan. Add cumin seeds. Once the seeds splutter, add curry leaves and green chillies. Saute and add urad dal and chana dal. Sauté and cook for 1 min or till the dals are lightly browned. Add ground nuts and dried red chillies. Cook for one more minute. Make sure the dals or groundnuts are not burned. Add the grated raw mango, turmeric powder, and salt. Mix well and cook for two minutes mixing in between. Switch off the gas and mix and let the mixture cool for 2-3 minutes. Mix few tablespoons of raw mango mixture at a time in the cooked rice until you get the desired tanginess. You can store any leftover mixture in the fridge for 1-2 months.

Fruit Shrikhand (Fruit Yogurt)

Fruit Shrikhand

Shrikhand is an Indian dessert made with hung yogurt, sugar, dry fruits, and cardamom powder. This is a fruity version of the traditional homemade Shrikhand. This is one of the desserts we had as kids (there were no pastries or doughnuts). We mostly had homemade desserts like these which we would help our grandmother prepare for us. My oldest memory of making Shrikhand is helping my grandmother whisk the yogurt as a 7-8 year old and waiting for her to divide it for us in bowls so that we can take our share and relish it in the summer heat.

Hung yogurt is basically the creamy thick yogurt you get when you drain out all the water from yogurt. You can use a muslin or cheese cloth and hand the yogurt on your kitchen tap or any other clean place for 4-6 hours. Since I wanted a very thick and creamy yogurt for this recipe, I left it over night. You can also use the Greek yogurt.

Fruit Yogurt

You can add any fruit of your choice. For me berries work the best and so does Mango. You can decide to leave the seeds or fruit bits in the Shrikhand or just pass the fruit puree through a fine sieve for a rich creamy shrikhand. Remember to chill it for 4-5 hours before serving. You can serve it with fresh fruits and drizzle it with the remaining fruit puree or make it a mini pickup dessert by piping it in mini tart shells. I made chocolate tart shells and piped the shrikhand using icing tips. However you serve it, this summer dessert is sure to please your taste buds with tangy fruits and health yogurt.

Fruit Shrikhand

Ingredients

Serves 5-6

  • 1 ½ cup Hung Yogurt*
  • Icing sugar to taste

Fruit puree

  • ½ cup strawberries
  • ½ cup blueberries
  • ½ cup mango pulp
  • Icing sugar to taste

Recipe

For the Strawberry Puree

Wash and chop the strawberries. Put them in a nonstick pan. Add a table spoon of sugar. You can add or reduce the quantity of sugar based on the natural sweetness of the fruit. Mix well and cook for 1-2 minutes. Once the strawberries are soft, mash them using the back of a spoon or spatula. Make sure to scrape the edges while cooking. Cook for 1-2 minutes or till the puree comes to boil. Let it cool for 5-10 minutes. Pass this through a fine sieve for a smooth and shiny fruit puree or just leave it as it is if you like bits of fruit in your Shrikhand.

For the Blueberry Puree

Follow the same procedure as the strawberry puree. Make sure to pass this puree through sieve or you will have the fruit peels in your Shrikhand.

For Mango Puree

Depending on the thickness of the mango juice, you can just pass it through a sieve and use it or if it is too runny cook it for few minutes to make it thicker and then use it. As with other fruits, add sugar based on the natural sweetness of the fruit.

For Shrikhand

Whip the yogurt using a whisk or an electric mixer until it is smooth and creamy (approximately 2-3 minutes should be good). Divide the yogurt in three bowls. Add the fruit puree of your choice to each bowl. Add 2 table spoon of puree at a time and whisk well. Add more or less puree depending on taste and consistency requirements. I used approximate 2-3 tbsp of puree for half cup of hung yogurt.  Add icing sugar as per taste. Mix well and chill for at least 4 hours before serving. You can serve it with fresh fruits, fresh cream, or a drizzle of fruit puree on top. You can even fill the Shrikhand in plain tarts or chocolate tarts.

*To make hung yogurt, put fresh yogurt in a muslin or cheese cloth, tie the ends and hang it to your kitchen tap over night. Once all the water I drained out, transfer the thick yogurt to a bowl and chill.

Ker Sangri

Ker Sangri

Ker sangri is one of the most popular dishes from Rajasthan.  Ker sangri are dried berries and beans which are found in abundance in the desert. They do not look edible at first look but you have to taste this curry to know why it is so popular in Rajasthani cuisine. It is a part of almost every Rajasthani wedding menu. There are different ways to prepare this curry. This is the recipe which is cooked at my place.

You need to soak ker sangri overnight. Some people soak this in buttermilk too but plain water works fine. It swells to more than double in size. Make sure to wash it well under running water to get rid of any impurities.

If you do not have dry mango powder, you can use tamarind water to add the sourness. This curry is ideal for travelling too as it stays good for 2-3 days without refrigeration. This curry tastes best with puri, missi roti, paratha, and rotis.

Ker Sangri

Ingredients

Serves 2-3

  • ½ cup ker sangri
  • 8-10 cashewnuts broken
  • 10 raisins
  • 2 dates chopped
  • 3 tbsp oil
  • ¼ tsp cumin seeds (jeera)
  • ¼ tsp mustard seeds (rai)
  • 2 dry red chillies broken
  • ¼ tsp asafetida (heeng)
  • 2 tsp red chilli powder
  • 2 tsp coriander powder
  • ¼ tsp turmeric powder
  • 1 tsp dry mango powder (amchur)
  • 2 tsp sugar
  • ¼ cup water
  • Salt as per taste

Recipe

Soak ker sangri in water over night. Wash it well under running water.  Bring 4-5 cups of water to boil and add the ker sangri, cashews, dates, and raisins. Let them boil for 8-10 mins or until they are tender. Drain the water.

Heat oil in a deep pan or kadhai. Add mustard seeds, cumin seeds, asafetida, and dried red chilli. Once the seeds pop, add the boiled ker sangri, cashews, and raisins, salt, red chilli powder, turmeric, coriander powder, sugar, and dry mango powder and ¼ cup water. Mix well. Cook for 10-12 mins till the oil floats on top. Serve with puri, roti or parathas.


Kachori (Rajasthani Savory Snack)

Kachori (Rajasthani Savory Snack)

Kachori is an Indian snack similar to samosa (its more famous cousin) but yet different. It is a flaky pastry filled with different spices and lentils. Just like other famous snacks, there are lots of varieties of kachoris in different parts of India. This one is my grandmother’s recipe aka Bhoji wali Kachori and one of her most famous ones. Everyone in our family loves this snack made by my grandmother. I love this kachori so much that I do not eat the kachoris available outside. For me THIS is kachori 🙂

The filling made with besan is what makes this kachori different from the other kachoris. Mostly kachoris are filled with different lentils but this one has no lentils. Roasted gram flour and spices complement the flaky crust perfectly.

Only tricky part with this filling/masala is to roast the gram flour(besan) well. If the besan is not roasted properly, the kachoris will not be fluffy. If it is roasted too much, the taste is ruined. It is very important to keep mixing the besan continuously while you roast it. Our house lives on no onion garlic diet most of the times so no onion in this one. You can add onions to this masala if you like.

The dough for kachori should not be too firm. Soft and pliable dough makes better kachoris. Another trick that I learnt from my grandmother is to roll the kachoris twice (only twice) after you have filled the masala and shaped the kachori. This distributes the filling evenly and each and every kachori puffs when you do this.

These kachoris can be stored up to a week in airtight container. Eat them plain or with chutney of your choice or make a chat by adding yogurt and different chutneys.

Kachori (Rajasthani Savory Snack)

Ingredients

Makes 20 kachoris

For Dough

  • 2 cups all purpose flour (maida)
  • 3 tbsp oil
  • ½ tsp salt

For Masala

  • 2/3 cup gram flour (besan)
  • ¼ cup oil
  • 1 tsp red chilli powder
  • ¼ tsp turmeric powder
  • ¼ tsp citric acid (nimbu sat)
  • 4 tbsp chopped coriander
  • 4-5 green chillies coarsely ground
  • ½ tsp garam masala
  • 1 tsp salt
  • Oil for frying

Recipe

For Dough

Mix the all purpose flour, salt, and oil. Add little water at a time and make soft dough. Cover and keep aside for 15 minutes.

For the Masala

Put oil and besan in a thick bottomed pan/non stick pan and mix well. Do not heat the oil before adding the besan. This will help you avoid lumps in the masala. Now switch on the flame and roast the besan and oil mixture for 3-4 minutes on low flame. Roasting time varies according to the heat. The color of the mixture should be light brown. Besan can burn quickly so make sure to keep mixing it nonstop. Switch off the flame. Add green chillies, coriander, red chilli powder, turmeric, citric acid, garam masala, salt, and 1 tbsp water. Mix well. Keep aide to cool.

Divide the dough and masala into 20 equal portions. Take one portion of the dough and stretch it (appx 3 inches) using your fingers. Put one portion of masala in the center and seal the edges and flatten it very lightly.  Roll the kachori twice using a rolling pin. Follow the same process for rest of the kachoris.

Warm oil in a kadhai/thick bottomed pan. Oil should be just warm and not hot when you put the kachoris in for frying. Fry on low flame till the kachoris are golden brown. Serve hot or at room temperature.


Kairi ka Takku (Grated Mango Pickle)

Kairi ka Takku (Grated Mango Pickle)

Kairi ka takku or grated mango pickle is an easier and quicker version of the traditional mango pickle which takes lot of time and expertise to make. Takku is made with grated raw mango mixed with powdered spices like mustard, fennel, and fenugreek seeds. This grated mango pickle usually includes onions too but my mom makes it without onions. This is her summer special recipe of the kairi ka takku which she serves with hot rice, dal, and papad.

Sour raw mangoes give the best results for this recipe.  If the mangoes are not very sour, then you can add citric acid (nimbu ka sat). Choose firm mangoes and peel them before grating the mangoes.  Just like Raw Mango, you can also use grated white radish to make Muli ka takku.

Dry roast the masalas seperately for proper roasting and good flavour. Let the spices cool down completely before grinding them. You can roast and grind the spices in quantity and keep them refrigerated for future use too.

Since the masala has fenugreek and mustard seeds, it will taste slightly bitter when you make it but the bitterness will go away in 24-36 hours. You can keep the takku refrigerated for 2-3 weeks. Make sure to use a clean and dry spoon to serve the takku.  This takku tastes best with hot rice and dal. You can serve it as accompaniment to any Indian meal.

Kairi ka Takku (Grated Mango Pickle)

Ingredients

  • 2 ½ cup/300gms raw mango peeled and grated
  • 2 tbsp/25gms mustard seeds
  • 1 tbsp fenugreek seeds (methi)
  • 1 tbsp fennel seeds (saunf)
  • ¼ tsp citric acid (Nimbu sat) (add only if the mango is not sour)
  • 3 tbsp/ 50gms red chilli powder
  • ¼ tsp turmeric
  • 3 tbsp/50gms salt
  • 1/4tsp asafetida (heeng)
  • 1 cup/235ml oil
  • ¼ tsp mustard seeds
  • ¼ tsp cumin seeds
  • 2-3 dry red chillies broken

Recipe

Dry roast the fennel seeds and fenugreek seeds separately. Cool completely. Grind the mustard seeds, fennel seeds, and fenugreek seeds to fine powder. Add red chilli, turmeric, salt, and asafetida to this powder and mix well. Keep aside.

Heat oil and add dry red chillies, mustard seeds, and cumin seeds. Once the seeds pop, switch off the flame and let the oil cool down for 3-4 minutes. Add the masala powder and mix well. Add the grated mango and mix again. Cover and keep aside for 24-36 hours. Mix it occasionally. Once the pickle is done keep it refrigerated. Serve with rice or roti.


Rajasthani Dana Methi Sabji (Dried Fenugreek Seeds Curry)

Rajasthani Dana Methi Sabji (Dried Fenugreek Seeds Curry)

Dana Methi ki sabji or Fenugreek seeds curry is an authentic Rajasthani curry made with dry fenugreek seeds, dried fruits like dates, cashews, and raisins, and sugar or jaggery. People in Rajasthan depend a lot of dried foods like fenugreek seeds, and ker sangri due to the hot weather and unavailability of fresh vegetables. These curries are both tasty and nutritious. This is my mom’s recipe of the dana methi sabji. This is kind of fixed curry for festivals and it is also a good option for travelling as it does not need refrigeration.

Fenugreek seeds have a very sharp, bitter, and pungent flavor. It is very important to soak them and wash them well to get rid of the yellow water and bitter taste. My mom’s tip that works everytime for me is to soak the seeds in warm water and wash them thoroughly in a colander under running water. Some people say you shouldn’t touch the seeds while soaking or they will taste bitter. I am yet to try this tip though.

There are different versions of this curry. You can make it sweet and sour (like this one), spicy version without sugar and dry fruits and with papad, with papad and moong dal dumplings called mangodis. You can substitute sugar with jaggery  if you want to make this healthier.

This curry tastes good with puri or whole wheat parathas. You can serve it cold or hot.

Rajasthani Dana Methi Sabji (Dried Fenugreek Seeds Curry)

Ingredients

Serves 4

  • ½ cup dried fenugreek seeds (dana methi) soaked overnight
  • 2 tbsp oil
  • 8-10 curry leaves
  • 1-2 dry red chillies
  • ¼ tsp mustard seeds
  • ¼ tsp cumin seeds
  • 10-12 cashew nuts
  • 2 tsp red chilli powder
  • ¼ tsp turmeric powder
  • 2 tsp coriander powder
  • 10-12 raisins
  • 2-3 dates chopped
  • ¼ cup chopped raw mango (replace with 1 tsp dry mango powder (amchur) if raw mango is not available)
  • 4 tsp sugar
  • 1 tbsp water
  • Salt to taste

Recipe

Drain the water from methi seeds and put them in a strainer. Wash them under running water for 1-2 minutes to drain out the bitter taste.  Keep washing till the water that you drain from the seeds is clear (it should not be yellow)

Heat oil in a thick bottomed pan or kadhai. Add curry leaves, dry red chillies, mustard seeds, cumin seeds, and cashewnuts. Once the cashews are light brown, add the soaked methi seeds, raw mango pieces, salt, red chilli powder, coriander powder, raisins, and dates. Mix well and cook for two minutes on low flame. Add sugar and 1 tbsp water. Mix well and cook for two minutes. Remove from heat. Over cooking this curry will spoil its taste. Serve hot with parathas or puri.