Badam ka Seera

Almond Halwa

Seera can be cooked very quickly. Roasting the flour is the only thing that takes time. And well roasted flour is the key to a delicious seera. Flour gets burned quickly. Roast it on a slow or medium flame and do not leave it unattended. If it is over roasted it can even taste bitter. Do remember to soak the almonds for at least 4 hours. This will help to grind them very smooth.

Badaam ka Seera

Seera Puri is the traditional combination but the combo I like is papd churi with seera. Crush a roasted papad and serve it with the seera. It cuts the sweetness of seera. This seera tastes best when it is hot.

Almond Halwa

Ingredients

Serves 4

  • ½ cup whole wheat flour (gehun ka aata)
  • ½ cup pure ghee
  • ½ cup sugar
  • 10-15 almonds soaked for 4 hours
  • 1 ¼ cup hot water

Recipe

Peel the almonds and grind them to a smooth puree. Use little water if required.

Heat ghee in a kadhai or a thick bottomed pan. Add the flour and roast on low flame till it is lightly browned and you can smell the aroma of ghee and flour. Keep mixing the flour non-stop or it might get burnt. Add the almond paste and roast again for 2-3 minutes till the flour is brownish. Add the hot water and stir continuously making sure no lumps are formed. Once the seera is slightly thicker, add the sugar and mix well. Cook for 1-2 minutes. Serve hot with papad.


Thalipeeth (Maharashtrian Savory Pancakes)

Thalipeeth is a Maharashtrian breakfast or tea time snack. It is a very nutritious dish made with seven types of flours and fresh vegetables. Thalipeeth is usually served with fresh homemade butter, ghee, or thick yogurt. The recipe varies from region to region or even family to family and this is the recipe I have eaten. The flour for thalipeeth is called Bhajni. It is a mix of various flours. Even this differs from family to family. Some people add ragi and semolina while some leave out the bajra flour. I use the store bought bhajni flour which is easily available.

Thalipeeth

Even with the other ingredients, it differs from home to home. Traditionally it is just onions but you can add chopped spinach, chopped methi leaves, grated carrots or grated cabbage too. You can also add sesame seeds or coarsely ground peanuts. Rolling the thalipeeth can be a task. Since the dough has bajra flour and besan in it, it is not easy to roll with a rolling pin. If you cannot shape it with your palm like bajra rotis, you can put it between sheets of greased plastic and roll it. I used two sheets of butter paper and did not have to use the extra oil for greasing.

Thalipeeth

Thalipeeth is thicker than roti. Making holes in the thalipeeth and cooking it covered helps it to cook evenly. Thalipeeth is best eaten hot with homemade butter, ghee, or thick yogurt. I like it with garlic chutney and yogurt.

Thalipeeth

Ingredients

Makes 12 Thalipeeths

  • 3 cups Thalipeeth Bhajani flour
  • 1 onion finely chopped
  • 1 green chilli finely chopped
  • ¼ cup chopped coriander leaves
  • 1 cup chopped spinach
  • 2 tsp red chili powder
  • ¼ tsp turmeric powder
  • Salt to taste
  • Warm water for kneading the dough
  • 1 tbsp oil
  • oil for cooking

Recipe

Mix the thalipeeth flour, onions, spinach, chillies, coriander leaves, salt, red chili powder, turmeric powder, and oil. Add little warm water at a time and knead the mixture into stiff but pliable dough. Cover it and keep it aside for 5-10 minutes. Knead the dough again and divide it into number of thalipeeths you want to make. Roll each portion into circles. You can do this with your palms just like the like the bajra roti is made or place the dough ball in between two sheets of butter paper and roll it carefully. Make a small hole in the center of the thalipeeth. If you are making a big roti, bigger than 5 inches in diameter, you can make multiple holes. These holes are used to pour oil and cook the thalipeeth evenly.

Heat a tava and smear around 1/2 tsp oil on the tava. Peel the butter paper from the thalipeeth carefully and  place the thalipeeth on the tava. Pour some oil in the holes and around the thalipeeth. Cover and cook for around two minutes on medium heat. Flip and cook for two more minute. Serve hot with homemade butter, yogurt, or garlic chutney.


Thalipeeth Bhajni

To make the Thalipeeth flour at home, roast the following flours separately on low heat for 8-10 mins making sure you do not burn any of them. Once the flours are roasted and cooled completely, mix them and store in airtight container. This thalipeeth flour can be stored for 4-5 months.

  • 1 cup Bajra atta (Millet flour)
  • 1/2 cup Chawal ka atta (rice flour)
  • 1/2 cup Besan (split bengal gram flour)
  • 1/2 cup Jowar aata (sorghum flour) 1/3 cup urad dal aata (split black gram flour)
  • 1/2 cup gehu ka atta (wheat flour)
  • 1/4 cup dhania powder (ground coriander seeds)

Aalu Toast

Aalu Toast

Aalu toast is a fantastic lip smacking street food you can eat only in Hyderabad or so I thought until a friend from Jaipur shared this similar recipe. Aalu toast originally is triangle shaped bread topped with potato mix, deep fried and then served as a chat with various chutneys and lots of sev. This one is more of a bite sized DIY chat version. There is no match for the aalu toast you can get at couple of places in Hyderabad but this comes closest if you want to make it at home. Thank you Kshamta for reminding me of this delicious street food 🙂

You can use any bread you like. White, wholewheat, or multi-grain. I tried white and multigrain breads and both tasted fine. To make the chat healthier you can even toast the bread instead of frying it. The idea is to have a crisp and crunchy base. How you do is totally up to you. The fried one tastes better of course.

aalu toast

This is one of the best DIY snacks. You can prepare the chutneys, potato mash, and bread n advance and just let the guests decide on how sweet or spicy they want their chat. Since the chutneys and potato can make the bread soggy, this chat is best enjoyed immediately after it is topped with potato and chutneys.

Aalu Toast

Ingredients

  • 3 slices of bread
  • 1 potato boiled and mashed
  • ½ tsp chilli powder
  • ½ tsp chat masala
  • ½ tsp cumin powder
  • 2-3 tbsp thick yogurt
  • 2-3 tbsp mint chutney
  • 2-3 tbsp sweet chutney
  • 1 small onion finely chopped
  • 1/4 cup thin sev
  • Salt to taste
  • Oil to fry the bread

Recipe

Cut the bread into bite sized pieces in desired shapes. I used cookie cutters to cut the bread into bite sized circles and squares.

Heat oil in a deep pan/kadhai and fry the bread till it is crisp and brown. Drain in on paper towel to remove excess oil. Keep aside. You can even toast the bread in oven if you want to make it healthier.

To the potato mash, add red chilli powder, cumin powder, and chat masala. Mix well and check for salt. Add salt if required.

Just before serving, put approximately 1 tsp potato masala on a piece of bread; top it with mint chutney, sweet chutney, yogurt, onions, and sev. Serve immediately.

Toast Cups

Toast Cups

Toast cups or mini quiches as they look like are a quick way to upgrade a simple toasted sandwich to look like a gourmet snack . It is a very easy dish to make. Bread is rolled, cut, and baked into cups, filled with different savory filling, topped with cheese, and baked into delicious hot snacks.

You can practically fill the toast cups with any filling you like. I like this Mexican filling with corn, capsicum, and paneer. The Mexican taco spice mix or the chili spice mix adds a new flavor and spice to the filling. It also makes it quick to cook.

You can choose to cut the edges of the bread if you like. Rolling the bread will make it easier to cut it and fit in the muffin mould. To add flavor to your toast cups, you can brush the cups with olive oil mixed with dried herbs like oregano, basil, thyme etc. You can use any cheese you like to top the toast cups. If you want to prepare the dish in advance, you can prepare the filling and toast the cups lightly. Assemble and bake the cups just before serving. This snack tastes best when it is hot.

Ingredients

  • 12 slices of bread with the edges cut
  • ½ cup boiled/steamed sweet corn
  • ¼ cup mixed bell peppers chopped
  • ¼ cup paneer chopped
  • ¼ cup onion finely chopped
  • 35 gms Taco seasoning/any Mexican seasoning
  • 5 tbsp olive oil
  • 2-3 tbsp water
  • Cheese to taste ( used cheddar cheese)
  • Salt to taste

Recipe

Heat oil in a pan. Add onions and sauté for 1-2 minutes. Add the bell peppers, paneer, and sweet corn. Mix well and cook for 1-2 minutes. Add the taco seasoning and 2 tbsp water and mix well. Taste and add salt if required. Cook for 3-4 minutes mixing in between. Transfer to a bowl and keep aside.

For the toast cups, roll a bread slice using a rolling pin. Cut a circle using a cookie cutter or a sharp edged bowl. Divide the circle into two. Adjust the semi circles in a muffin tray to make a cup. Follow the same procedure for rest of the bread slices.  Spray the toast cups with olive oil. Pre-heat an oven to 180 degrees Celsius and bake the cups for 10-12 minutes.

Take the tray out of the oven. Add a table spoon of filling in each cup. Top it with grated cheese and bake for 8-10 minutes till the cheese melts. Serve hot.

Kachori (Rajasthani Savory Snack)

Kachori (Rajasthani Savory Snack)

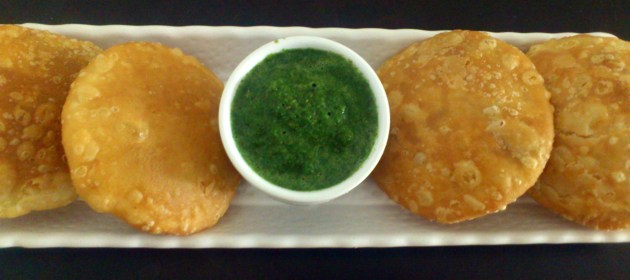
Kachori is an Indian snack similar to samosa (its more famous cousin) but yet different. It is a flaky pastry filled with different spices and lentils. Just like other famous snacks, there are lots of varieties of kachoris in different parts of India. This one is my grandmother’s recipe aka Bhoji wali Kachori and one of her most famous ones. Everyone in our family loves this snack made by my grandmother. I love this kachori so much that I do not eat the kachoris available outside. For me THIS is kachori 🙂

The filling made with besan is what makes this kachori different from the other kachoris. Mostly kachoris are filled with different lentils but this one has no lentils. Roasted gram flour and spices complement the flaky crust perfectly.

Only tricky part with this filling/masala is to roast the gram flour(besan) well. If the besan is not roasted properly, the kachoris will not be fluffy. If it is roasted too much, the taste is ruined. It is very important to keep mixing the besan continuously while you roast it. Our house lives on no onion garlic diet most of the times so no onion in this one. You can add onions to this masala if you like.

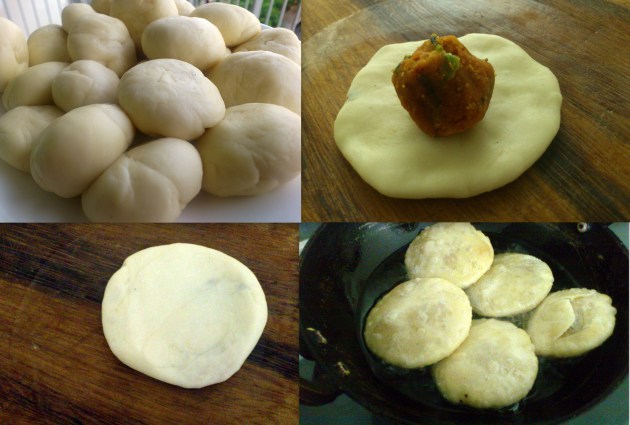
The dough for kachori should not be too firm. Soft and pliable dough makes better kachoris. Another trick that I learnt from my grandmother is to roll the kachoris twice (only twice) after you have filled the masala and shaped the kachori. This distributes the filling evenly and each and every kachori puffs when you do this.

These kachoris can be stored up to a week in airtight container. Eat them plain or with chutney of your choice or make a chat by adding yogurt and different chutneys.

Kachori (Rajasthani Savory Snack)

Ingredients

Makes 20 kachoris

For Dough

  • 2 cups all purpose flour (maida)
  • 3 tbsp oil
  • ½ tsp salt

For Masala

  • 2/3 cup gram flour (besan)
  • ¼ cup oil
  • 1 tsp red chilli powder
  • ¼ tsp turmeric powder
  • ¼ tsp citric acid (nimbu sat)
  • 4 tbsp chopped coriander
  • 4-5 green chillies coarsely ground
  • ½ tsp garam masala
  • 1 tsp salt
  • Oil for frying

Recipe

For Dough

Mix the all purpose flour, salt, and oil. Add little water at a time and make soft dough. Cover and keep aside for 15 minutes.

For the Masala

Put oil and besan in a thick bottomed pan/non stick pan and mix well. Do not heat the oil before adding the besan. This will help you avoid lumps in the masala. Now switch on the flame and roast the besan and oil mixture for 3-4 minutes on low flame. Roasting time varies according to the heat. The color of the mixture should be light brown. Besan can burn quickly so make sure to keep mixing it nonstop. Switch off the flame. Add green chillies, coriander, red chilli powder, turmeric, citric acid, garam masala, salt, and 1 tbsp water. Mix well. Keep aide to cool.

Divide the dough and masala into 20 equal portions. Take one portion of the dough and stretch it (appx 3 inches) using your fingers. Put one portion of masala in the center and seal the edges and flatten it very lightly.  Roll the kachori twice using a rolling pin. Follow the same process for rest of the kachoris.

Warm oil in a kadhai/thick bottomed pan. Oil should be just warm and not hot when you put the kachoris in for frying. Fry on low flame till the kachoris are golden brown. Serve hot or at room temperature.


Corn Fritters (Makkai Ke Pakode)

Corn Fritters (Makkai Ke Pakode)

Corn fritters or Makkai ki pakodi is a one of my favorite childhood snacks. This snack belongs to the pre-MacDonald era when people did not eat out a lot and Sundays were relaxing leisure time with family. We would wait one full week to eat the Sunday special snack or meal. I might be biased as I love corn but this just tastes amazing during the rainy season which is also the season of corn.

These fritters are made using the corn on the cob you get during rainy season. I have not tried this with the sweet corn yet. As kids we used to help our mom take the corn out of the cob and demand more fritters for the help 🙂

These fritters are very quick to make and do not require lot of ingredients. The fresher the corn, better the taste. Shelling the corn is the only time consuming task for these fritter. You can buy the frozen corn too if you are short on time. Only thing you need to take care of is not to let the corn turn to a paste while grinding it. It should be just crushed lightly.

You can enjoy these fritters with a hot cup of tea. You can serve them with mint chutney or ketchup or the classic tamarind chutney. I just like them hot and crispy without any dip.

Corn Fritters (Makkai Ke Pakode)

Ingredients

  • 1 cup corn kernels
  • 2 green chillies
  • 4 tbsp gram flour (Besan)
  • 1 tbsp chopped coriander
  • Salt to taste
  • Oil for frying

Recipe

Grind the corn, green chillies and salt very coarsely. It should be like slightly crushed corn.

Add gram flour and chopped coriander. Check for salt and spice at this stage. You can add ½ tsp of red chilli powder if the green chillies are not very spicy.

Heat enough oil to fry the fritters. Grease your palms with little oil. Take little mixture at a time in your hand and shape it like small patty and fry it in hot oil on low to medium flame till its crispy and golden brown. Drain on a tissue or absorbent paper and serve hot.